Friday, 20 June 2014

The Next Granny Square Handbag

If you follow my Facebook page you might know that a couple of weeks ago while sorting out my crochet cupboard I found no fewer than eight nearly (but not quite) finished projects... I made it my mission to complete at least one a week until my cupboard is an oasis of calm.

Here is one of them, finished last night, my second Happy Granny Bag.  After making the first one back in April (see post here) I decided that (1) it would be improved with a fabric lining and (2) a shoulder strap would be more my style. So I raided my stash for some colours that I liked and got started...

From this:

To this:

Here is the back:


Here is a close-up of the lining (I am particularly proud of this because I don't very often use a needle and thread instead of a crochet hook):


And here are a couple of action shots, beautifully modelled by yours truly, hehe!


I think I might be becoming addicted to granny squares, I'm already plotting bag number three... 


Friday, 2 May 2014

Revealed - a Giant Crocheted Octopus Hat!

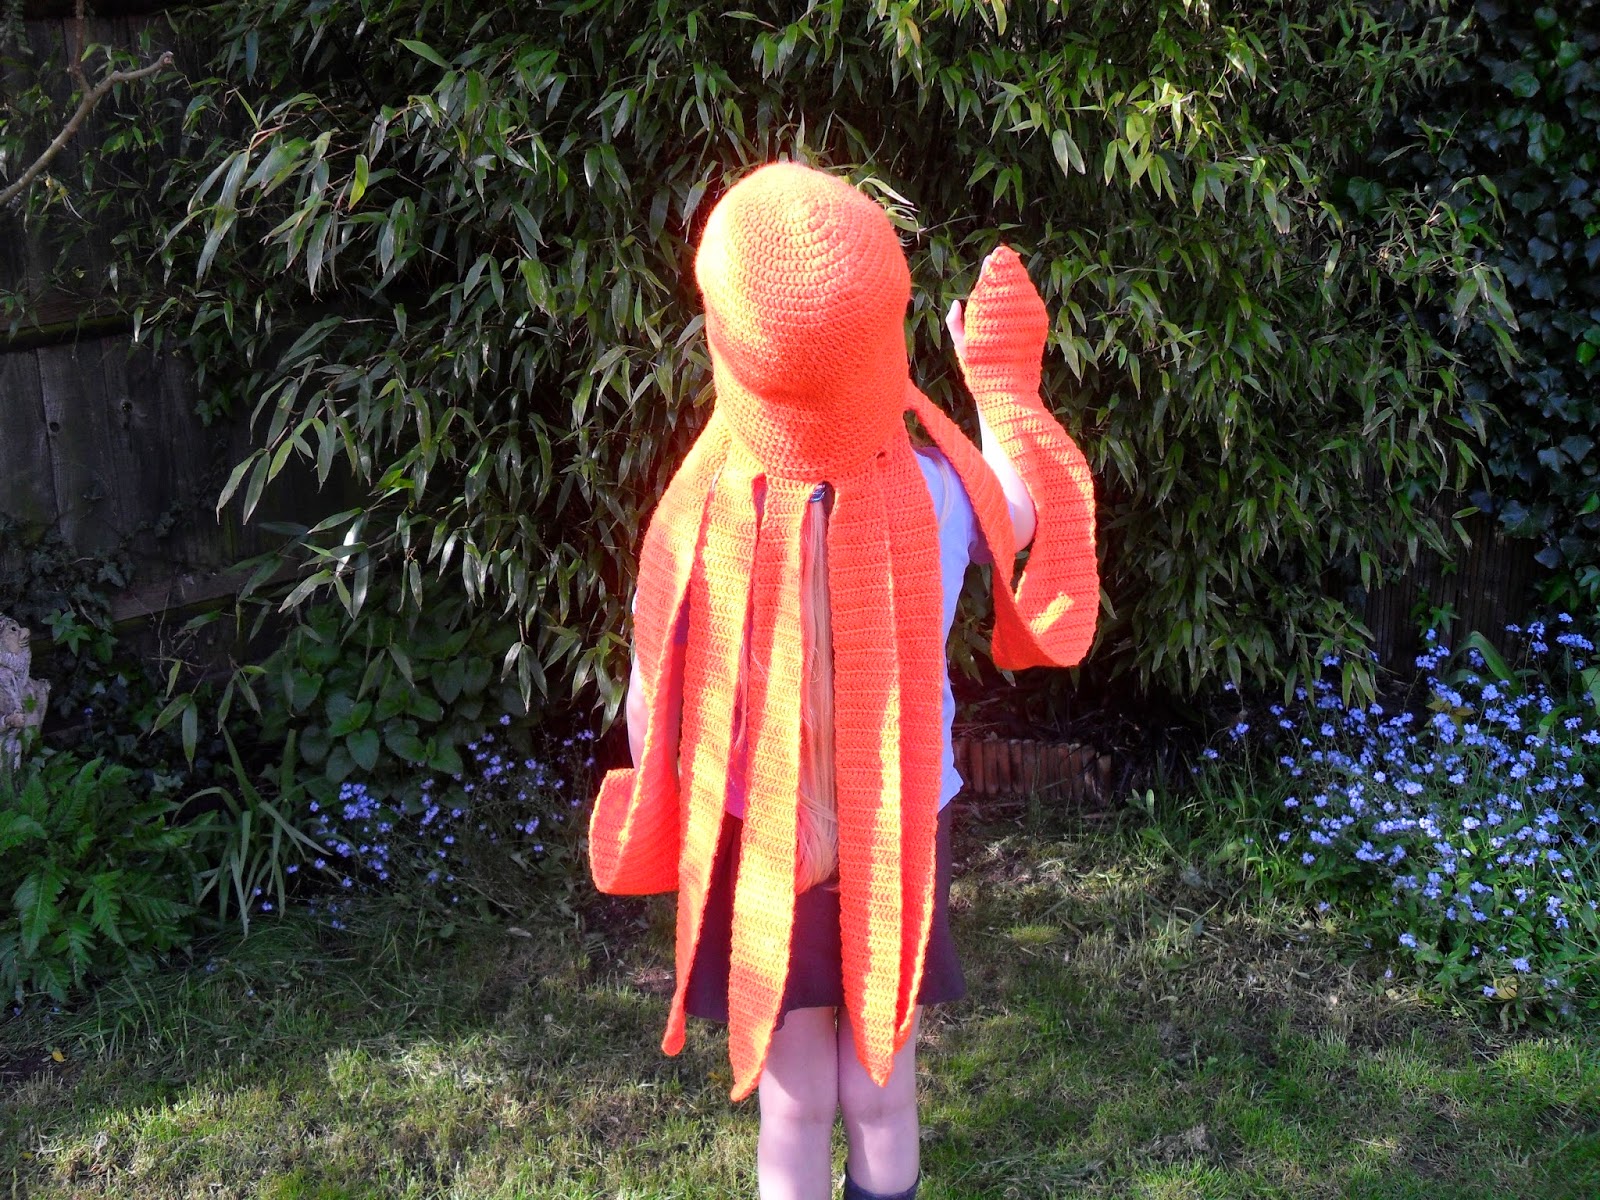
If you follow my Facebook page you might recall that earlier in the year I was very excited to be working on a large mysterious orange coloured commission for a client. He wishes to remain anonymous for the time being but I am pleased to report that he is happy for me to share the finished project with you. May I present..... drum roll please.... Octohat!


The story actually began in August 2013 at a birthday party. My future client and I got chatting and a few glasses of wine later the idea of an enormous octopus shaped hat with useful arms was born. At the time it seemed the best idea in the world but after the inevitable hangover, normal life resumed and I thought nothing more about it. Until a few months later, when he contacted me to make it a reality. We got together with a notebook (and a couple more glasses of wine) and a PLAN was born.

The Brief - A hat shaped like an octopus to fit an adult head. Eight long arms hanging down from the bottom of the hat section, two of them long enough to attach to the wrists (for stylish cycling around the local area). Cartoon style face.

The Method - I sat down with my Trusty Crochet Notebook and a pencil and worked out exactly what would be needed: how many rows, how many stitches, how much yarn, how much time (and how much to charge!). It was a huge beast of a hat, at least ten times more stitches than a standard beanie plus extras like the face and working out the best way of stuffing the head so it was washable but not too hot.

The Result - Octohat was born! Here are some more pictures to show you just how epic it really is, modelled by me (I bet you always wondered what I look like...) and my Little Helper.

The front:


The side:


The back:


An arty close-up:


It even has wrist-warmers for those long windswept cycle rides:


The Conclusion - With hindsight I underestimated the time needed by at least a factor of three but never mind. It was a Grand Project and I enjoyed the process of turning a pencil sketch into something real and three dimensional (but not so much the endless orange rows of treble crochet that made up the arms...).

I am busy writing up the pattern for my Etsy Shop, so if you would like to make an Octohat for yourself (and quite frankly who wouldn't?), pop a comment on here or type your email into the "subscribe" box up above and I will let you know when it is ready :-)


Tuesday, 22 April 2014

The Happy Granny Handbag


Have you bought a crochet magazine on impulse simply because you couldn't resist the free yarn on the front? Me too... Gorgeous colours, just right for assorted granny squares, but unfortunately only enough for six! What to do with them? A cube was the obvious choice but not very useful.

So, I rummaged around for some complementary colours in my stash. Thirteen squares and a pair of crochet handles later, The Happy Granny Handbag was born. Here is the front:


And here is the back:


And here is a close-up to show off just how lovely the yarn really is :-)


Just the right size for an A5 notebook (mine follows me everywhere!) plus phone, keys, purse and an emergency banana...


It was so much fun I will definitely be making some more for my shop in different funky colours. Which colours would you choose?

Thursday, 27 March 2014

Amigurumi Mouse Free Crochet Pattern

Amigurumi Mouse
Free Crochet Pattern
They are so loveable it is difficult to stop at just one!


Last week I wrote about the pros and cons of using the amigurumi magic ring to start a piece of crochet. So, today I thought I would give you a free crochet pattern so you can test it out. It is very simple and is one of the first projects I worked out for myself and wrote down in my trusty crochet notebook, which follows me and my craft bag everywhere.

The pattern is for a sweet little amigurumi mouse and shouldn't take more than an hour or two to complete. An ideal pet, this one won't eat your cheese! If you have a cat you could even add some catnip and maybe a bell to the stuffing.

You will need:
Yarn = An oddment (approx. 7g) of DK yarn in a colour of your choice. In the picture above, I have used Patons Fab DK 100% acrylic yarn.
Hook = 3.5mm
Other materials = Polyester toy stuffing, three black 6mm safety eyes.
Tension = 23 dc stitches to 10cm/4 inches. The tension is not critical. With the stated tension, the finished mouse is approx. 6cm from nose to rear (not including tail).
Notes
I use UK stitch names in this pattern. If you are not used to UK notation, the following table will be useful:
US

UK
Ch (chain) = Ch (chain)
Slst (slip stitch) = Slst (slip stitch)
Sc (single crochet) = Dc (double crochet)
Hdc (half double crochet) = Htr (half treble crochet)
Dc (double crochet) = Tr (treble crochet)
Sc2tog (single crochet decrease) = Dc2tog (double crochet decrease)

This amigurumi pattern is mostly crocheted in double crochet in continuous rounds. You will also need to know how to do a slip stitch and chain stitch. Starting with an amigurumi style magic ring is optional but will give a neater finish. To learn how to make a magic ring, see my YouTube tutorial here 
Body
Start with a magic ring (or make 4 ch and join with a sl st)
Round 1: Ch 1, 6 dc in ring. (6 stitches)
Round 2: [dc in next 2 stitches, 2dc in next stitch] twice. (8 stitches)
Round 3: [dc in next 3 stitches, 2dc in next stitch] twice. (10 stitches)
Round 4: [dc in next 4 stitches, 2dc in next stitch] twice. (12 stitches)
Round 5: [dc in next 3 stitches, 2dc in next stitch] three times. (15 stitches)
Round 6: [dc in next 4 stitches, 2dc in next stitch] three times. (18 stitches)
Round 7: [dc in next 5 stitches, 2dc in next stitch] three times. (21 stitches)
Round 8: [dc in next 6 stitches, 2dc in next stitch] three times. (24 stitches)
Rounds 9 to 14 (6 rows): dc all round (24 stitches)
Insert safety eyes, two for the eyes and one for the nose and make sure the washers are tight. Note – before you push the washer on the back of the nose, make sure the magic ring is pulled tightly closed around the shaft and knotted firmly.
Round 15: [dc2tog, dc in next 2 stitches] six times. (18 stitches)
Round 16: [dc2tog, dc in next stitch] six times. (12 stitches)
Stuff the body section (do not finish off yet)
Round 18: dc2tog six times, slst in the next stitch. (6 stitches)
Tail: 18ch, dc in the second chain from the hook, dc all the way back along the chain.
Fasten off, leaving a long enough end to sew the hole neatly closed.


Ears

Make two
Start with a magic ring (or make 4 ch and join with a sl st)
Round 1: Ch 1, 6 dc in ring. (6 stitches)
Round 2: 2 dc in each of the next 5 stitches (i.e. not a complete round). (10 stitches)
Fasten off, leaving a long enough end to sew the ear to the body.

Face

If you have used safety eyes, the face is complete. If you prefer, the eyes and nose can be embroidered on using suitable thread.


If you have any comments or questions or spot any typo's, please feel free to comment below or email me on cogzspot@gmail.com I would love to see photo's of your finished mice!


©Cogzspot Woolly Things 2014 You may sell items made from this pattern, provided you acknowledge Zoe Coggon / Cogzspot Woolly Things as the pattern designer. It is your responsibility to ensure that any items made for sale comply with relevant local Trading Standards and Toy Safety Regulations.

Thursday, 20 March 2014

Amigurumi magic ring vs chains and a slip stitch - which is better?

Amigurumi magic ring. Love it, hate it or baffled by it? When I took up crochet again "seriously" a couple of years ago, it was partly because I discovered amigurumi. I love the way virtually anything can be "sculpted" out of little more than a single crochet stitch. I was amazed by the simplicity of the magic ring (also known as magic loop or magic circle) and how neatly it starts off a piece of work. Strangely, since mastering the magic ring, there are now times when I choose to go back to the more traditional way, with a few chains joined into a loop with a slipstitch.

So, here is a compare-and-contrast of the two ways of starting off when crocheting in rounds:


Chain and slip stitch
This kind of starting loop is quick and easy, especially for beginners. If you run the end under the first round of stitches you don't have to sew the end in. It won't pull open.
However, depending on how many chain stitches you start off with, you either have a gap in the middle or a very tight space to fit the hook into. The hole is not adjustable after it's made. Sometimes you also have a lump where the slip knot is.


This photo shows one of my daisies. The starting loop was four chain stitches joined with a slip stitch. I worked the next round of stiches over the top of the yarn end so I was able to simply snip it off without a darning needle in sight!


Magic ring

The size of the hole is adjustable to fit the number of stitches in the first round. The hole can be pulled completely closed, ideal when making a toy that will be stuffed. It has a very neat finish.
However, the end has to be sewn in. The loop can pull loose over time if not sewn in firmly enough. It can be tricky to master because you have to hold a loop of thread in place with your finger and carry on crocheting at the same time.


This photo (of Levi the Elephant's backside!) shows just how lovely and neat the magic ring can be.


Here is a video from my YouTube channel to you how to crochet a magic ring. It is my first ever YouTube crochet tutorial. I hope you find it helpful.

And in case you were wondering, here is a picture of my marvelous invention for holding my phone while recording the videos. I'm quite proud of my resourcefulness :-)


To see what other people thought my homemade tripod might be, have a look at the comments on my Facebook page here.


Wednesday, 29 January 2014

A Tetris Sampler and a Secret Project

I can hardly believe it is nearly the end of January already! Here in the South West of England, it has been a grey, wet stinker of a month, so to keep things cheerful I have been working on projects that wouldn't be the same without COLOUR!

The first is a large commission that is destined to be part hat, part work of art. I've been enjoying going right back to basics with consultations, sketches, tension swatches and a Plan, it has all been very exciting so far. For the time being, all I am willing to show you is this:


When Megahat is finished and the recipient is happy with it, I plan to tell you the whole story here on Cogzspot, so make sure you keep checking back! I have a sign up button for you to be notified by email when (and only when) new blog posts are published so please add your email address to the box on the right if you would like to find out what it turns into!

The second is a just for fun project that has brightened up my January and brought out my inner geek. Coloured squares joined together in groups of four, in a design that is not quite a pattern but definitely carefully planned. A TETRIS inspired blanket!


First of all, I had to decide which colour to use for each shape (or "Tetromino"). There have been several combinations depending on era and platform, so which to choose? I spent many happy hours playing Tetris on my flatmate's PC in the early 90s, but in the end I decided to aim for the current set of colours, standardised by The Tetris Company in 2001. With hindsight, I also think it would look nice in three or four harmonising colours, such as shades of cream and blues.

I decided to use plain treble crochet squares rather than granny squares so the blocks of colour would be solid. I made the pattern up by myself by trial and error. It is quite straightforward and I expect there are many similar patterns out there, Just in case you would like the exact pattern, I do intend to share it here on Cogzspot as soon as I have written it up...


I made and joined each individual Tetromino separately, so I could piece lay them out as I went like a jigsaw to plan the final design. Being a little OCD about these things, I didn't want to end up having to use half a piece just to finish a line. After a lot of rearranging I was really happy to find I could make a square from two of each Tetromino, with just one extra S, one extra I, and no fillers!


I have very little patience for a needle and thread, so I joined the squares using a slip stitch along just the back loops of the wrong side:


Once I had all the pieces and a plan, I set about joining them together. This was very fiddly because of all those corners. If I was doing it again, I would join the individual squares together one by one in rows then join each row together at the end.

To help strengthen the edges and keep them neat, I added a simple border. Now all that remains is to sew in all those ends. Hmm, perhaps I'll make another square and turn it into a cushion cover instead..


Tuesday, 7 January 2014

Here's to a Happy Hooky 2014

The children have been back at school for a week, and I am back into my work routine too, hurray! The best thing about this time of year is having a chance to to look back at the last twelve months and think about what worked, what didn't, what's changed and what's next.

So here for you is a short review of some of my favourite bits of 2013:

SLIPPERS

The first things I made in 2013. Filled an immediate need but no need to repeat...


ELEPHANTS

I made my first amigurumi elephant back in Autumn 2012 when crochet was still a hobby rather than part obsession, part source of income (to see my shop, click here). Since then I have refined the pattern, spent a lot of time ensuring they are safe and legal for sale as toys, and increased the colour range. Different elephant designs have different names and characters and they all have their own characters. Here are a few introductions:


Meet Joseph (the amazing technicoloured elephant), Oscar, Alfred, Ollie, Emily, Bob Rastaphant, Esmeralda, Emma and last but not least, Agnes.

I haven't run out of names or colours yet, so there are definitely more to come...


SPECIAL MUG HUGS

One day I was struggling (and failing) to carry my drink, my laptop, and a biscuit from the kitchen to the office all at the same time. I thought to myself "if only I had somewhere safe to stash my biscuit"..... and so the Nice Cup of Tea and a Biscuit mug hug was born. I help out at the Clic Sargent eBay department (http://stores.ebay.co.uk/clicsargentshop/) once a week, so in recognition of the fabulous work done by the charity, and the fabulous people who work there, I decided to include a donation to Clic Sargent with every finished mug hug and every copy of the pattern I sell. They turned out to be my bestsellers before Christmas, which I am thrilled about.


DAISY CHAINS

A surprise hit in the spring, this daisy chain was the first item I sold on Etsy to someone I didn't already know, so it will always be special to me.


HATS

If you know how to handle a ball of wool, your life is not complete until you have made some hats :-)


NOVELTY PRESENTS

Sometimes I make things just for fun, and here are a some of them:


I also make granny squares....


PATTERNS

I am so happy that people want to buy what I make, but there are only so many hours in a day and I love to invent as much as I love to create.  Writing and publishing patterns is one thing I plan to focus on more this year. I'm sure lots of you lovely readers are fellow hookers, so I think giving people a choice between a pattern or a finished handmade item covers more bases. What do you think? I just need to remember to write down what stitches I used as I go along!

What is on your to do list for this year?